Menus
Options Menu
Contracts Menu
Windows Menu
Disasters Menu
Help Menu
Speed Menu (Server Only)
|
These are all the menus and menu items in 2KNet. The small differences between
the host and client game's menus will be explained.
Startup File Dialog (Server and Client)
This first dialog box of commands is seen by both server and client machines
when any player first loads the game; there is also a File menu within the
game itself, also discussed below. Both have commands for file management,
starting new games and scenarios, and for quitting 2KNet. See the Servers
and Clients page for elaboration on the differences in game setup and
play between the two machines, as well as your Quick-Start guide.
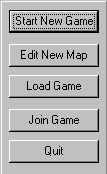
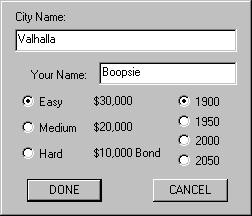
Start New Game
This command is used by the player that wants to host the game, becoming
the server machine. This command will prompt the City Name dialog, where
you enter your city's name and your player name into the text boxes. Choose
the difficulty level and the time scale, and hit Done to start buying, building
and boondoggling in your new city.
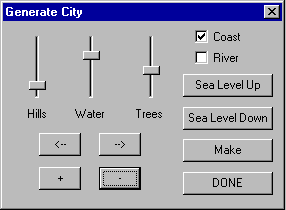
Edit New Map
This command is only for the server machine player, bringing up the Generate
City dialog in which the host can experiment with designing and redesigning
the landscape before the game begins. Once the game has been saved, this
command is no longer available. See the Tutorial manual for an overview
on terrain design.
Load Game
Opens a standard file-opening dialog box that allows you to view and load
all the different saved games and scenarios from wherever they are saved
on your drive (they default to the 2KNet directory). Saved games can be
transferred to other machines, which then become the server for that game.
(When you load in a saved game, the Enter Your Name box will default to
the name you gave at program installation; you'll have to remember other
names you may have used to manipulate districts managed under that name.)
Join Game
This command lets you get in on games that are currently running. You'll
be presented with the Connection Method screen, in which you choose the
data-transmission method. The Modem Connection method requires the phone
number of the server machine's modem, and the Internet method requires the
IP address of the server machine. The Winsock connections presume you're
on an existing network.
Hitting OK brings to you a Log In dialog where you add your player name
and connection info, if necessary. Exiting that screen brings up a Login
Process progress bar, telling you that the server is being contacted. Depending
on the connection method, you'll either go directly into a game, or you'll
see the Select Session dialog, where you can choose from a list of existing
games on whatever network was selected in the Connection Method screen.
Choose your poison and then jump into the action!

Quit
This command removes you from the allure of SimCity, and returns you to
the basic nonsense of existence.
File Menu (During Gameplay)
The server machine has two File menus during gameplay: the one found in
the Main menu, and the one found in the Network Server dialog box. The client
merely has the File menu found in the main menu. See the Servers
and Clients page for more info on the commands in the Network Server
window.

Save City
Under the Main file menu, this command opens a dialog box that allows you
to name and save a new city and choose the disk and directory or folder
where you want to save it, or save changes to an existing game. Both the
server and client can save running games, exit and can start the game later,
switching from host or client as agreed. However, in a running game, the
server also has the Save As command in the Network Server File menu, from
which they can save running games under a different name.
Load Tile Set
This command brings up an open-file dialog that lets you load in new graphics
for many of the buildings and images seen on your SimCity 2000 map. You
can even re-design the building tile of your choice--put your personal logo
on all your bank buildings! This magic is accomplished by way of the SimCity
Urban Renewal Kit (SCURK), a separate application bundled on the Network
Edition CD. Check out the Quick-Start Guide for installation info and Tutorial
5 for a run-through on some of SKURK's capabilities. SKURK also has its
own Help system for deeper research.
Exit
Rips SimCity from your computer's memory and makes it go away until you're
ready to resume your commissioner's responsibilities. You will be asked
if the city changes are to be saved. Any time you are logged off from the
server machine, you'll be asked if you want to save your game.
Options Menu
This menu controls a number of simulation and sound options so you can tailor
the game to your style of play. Options that are active have a checkmark
next to them.
Auto-Budget
When selected, Auto-Budget stops the Budget window from opening at the end
of each year, and automatically repeats the previous budget.
Auto-Goto
When active, Auto-Goto automatically centers the City window over an important
occurrence, such as a disaster. When inactive, you will still receive messages
to notify you of important goings-on in your city.
Music
Toggles the musical soundtrack on and off. The audio quality of the music
will vary greatly depending on the sound capabilities of your computer.
Sound
Toggles sound effects on and off. The audio quality of the sound effects
will vary greatly depending on the sound capabilities of your computer.
Contracts Menu
These commands let you arrange agreements on the sharing of certain resources
(power, police protection, etc.) between players in the game. Information
about the use of contracts can be found on the Player
Contracts page.
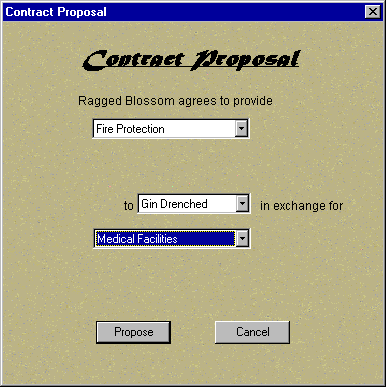
Propose Contract
Brings up the Contract Proposal window, where you can bait your trap.
Show Contracts
Displays the names and holders of existing contracts, and lets you view
details about the agreements.
Write Check
Brings up a dialog in which you can enter a cash figure that you can transmit
from your bank account to a fellow players, just to demonstrate that you're
swell.
Windows Menu
This menu lets you access the various windows in 2KNet.
Budget
Opens the Budget window for fiddling with your
city's finances.
Ordinances
Opens the Ordinance window for setting and inspecting
various city bonds, bills and ordinances.
The City Info Window
The City Info Window puts a tabbed, multi-view window onscreen that gives
you a window-by-window detailed breakdown about many aspects of your district,
and the development efforts of your co-players.

The City Info Window with the Population Tab Selected
Map Tab
The Map tab will pop up a small map of the entire city limits. A rectangle
somewhere in the map will outline the area of the city that is visible in
the City window. Complete information on the Map window can be found on
the Map Window page.
Graph Tab
The Graph tab will open the Graphs window, a dynamic display of selectable
city data.
Here you can chart the major statistical assessments of your own district
over time, or the same assessments evaluated city-wide. Complete information
on the Graphs window can be found on the Graphs Window
page.
Neighbor Tab
The Neighbor tab will display a small map of your city and its neighboring
cities, with their individual and collective populations. Complete infor
mation on the Neighbors window can be found on the Neighbor
Window page.
Population Tab
The Population Window tab will display information about your city's total
population, along with assessments of its health and education levels. Complete
information on the Population window can be found on the Population
Window page.
Industry Tab
The Industry tab will open the Industry window, that gives you three methods
of viewing data on the industrial development in your city. Complete information
on the City Industry window can be found on the Industry
Window page.
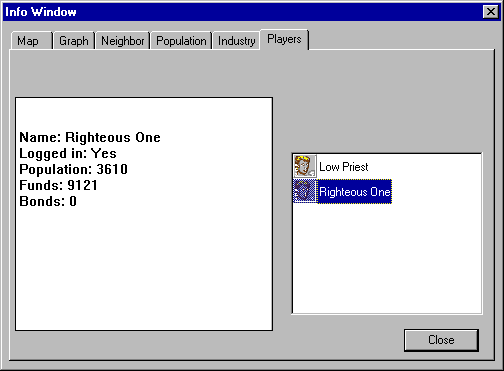
Players Tab
The Players tab lets you see icons for all of the current players that when
clicked will display statistical info about that player and their district.
Newspaper
This command lets you read the local paper. The paper will initially be
delivered at game startup, and periodically thereafter. Newspapers announcing
disasters will be also be immediately delivered. Your city's newspaper is
your link to your citizens. Reading it keeps you informed, not only of current
events, new inventions, city-development announcements and other important
or disastrous occurrences, but also of public-opinion polls. Watch your
paper closely to see what is important to your Sims.

Chat
Brings up the Chat window, through which you can send and receive message
to and from your fellow players. The Chat window is discussed in detail
on the Chat Window page.
Disasters Menu
This menu lets you activate various disasters, or disable them entirely.
For more information on disasters, see Dealing with Disasters on the Strategies
page. Disasters can happen at random in any player's distict, no matter
which player has enabled (or disabled) a particular disaster. The server
machine player can disable disasters in the Network Server window by choosing
Disable under the Disasters menu.
Fire
Causes a fire to break out somewhere within the city limits.
Flood
Causes a wave of raised water to come in off the coast or down a river,
washing away anything that isn't tied down.
Earthquake
Sets the earth to quakin' and the ground to shakin'.
Note: All power plants have a 50-year life span, and then they blow
up. They don't cause fires or spread radiation--they just stop working and
collapse. Watch your newspapers for warnings that power plants are getting
old. If you have No Disasters active, when power plants reach the end of
their lives, they are automatically rebuilt and you are automatically charged.
If you don't have enough cash in your city funds to pay for the power plant
replacement, it goes boom.
Help Menu
Help
The Help command opens the online help system (which you are now pleasurably--?--reading)
Use of the Help system is explained on the Help window
page.
About SimCity Online Client
Provides you with the version and copyright information about the game.
Speed Menu (Server Only)
This menu will only be availble for the server machine's player to set the
game speed for all players in the Network Server window. This drop-down
menu has the commands for setting the simulation to different speeds, including
Pause. The currently set speed will be displayed in the window. Actual speeds
will vary, depending on your computer, its microprocessor and clock speed,
and the type of connection you've made to play a networked game--for example,
in modem-to-modem games, the slowest modem in a player group can slow down
the transmission and reception of everyone's game data.
Pause
Stops time in the simulation.
Turtle
Sets the simulation to run slower than molasses on a cold day.
Llama
Sets the simulation to run at a medium speed.
Cheetah
Sets the simulation to run as fast as your computer will go.
|
(C)1996, Maxis, Inc.
|